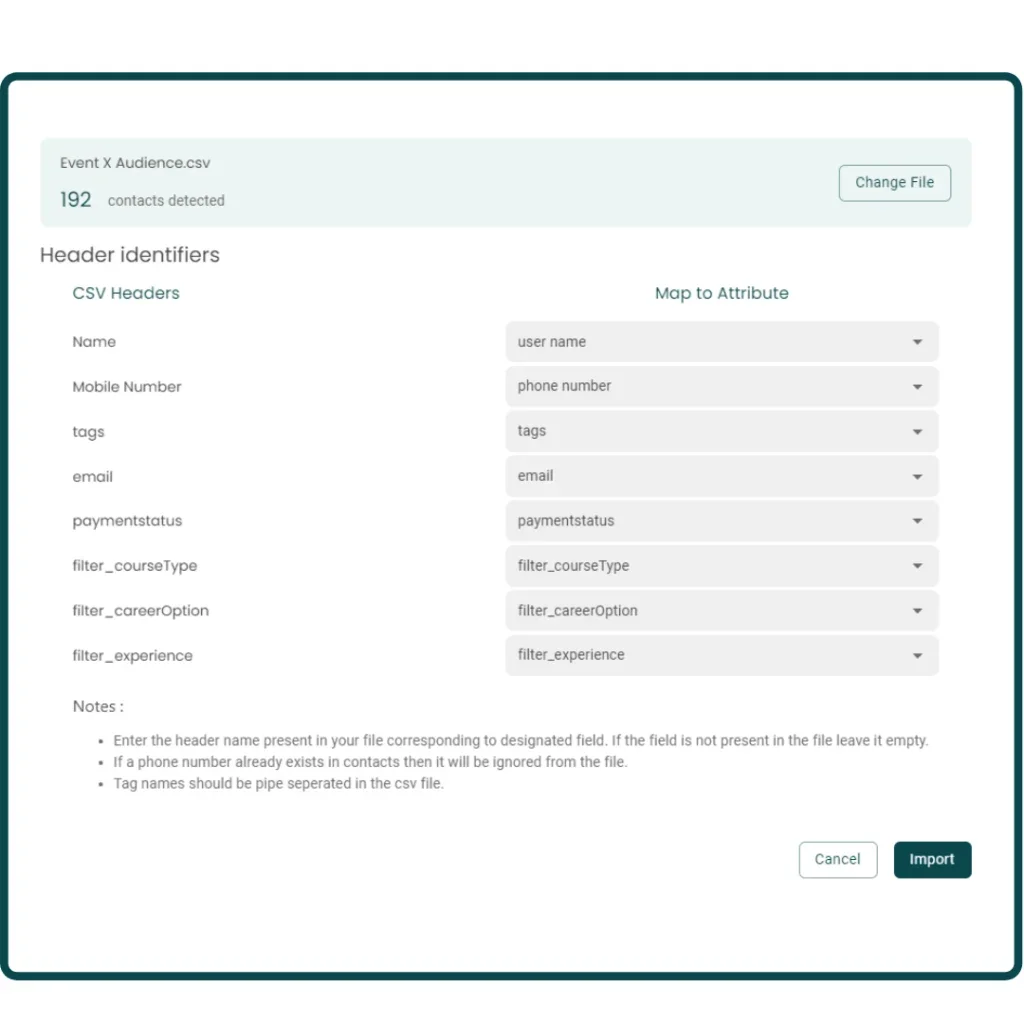
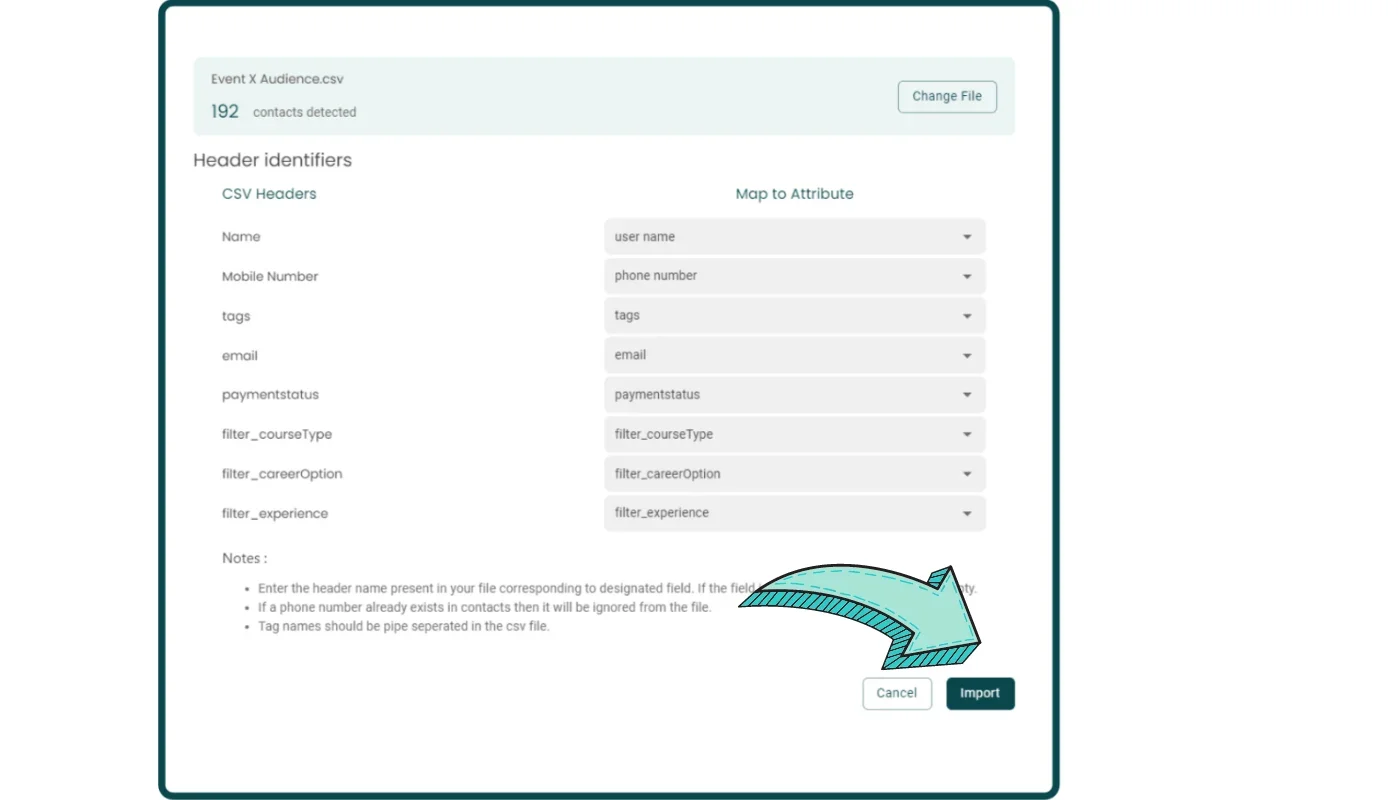
While uploading the CSV file of the contacts, some fields are automatically created in the Contacts Page and other needs to be mapped manually which has a specific format.
Fields that are automatically created and doesn’t need to be in the CSV file-
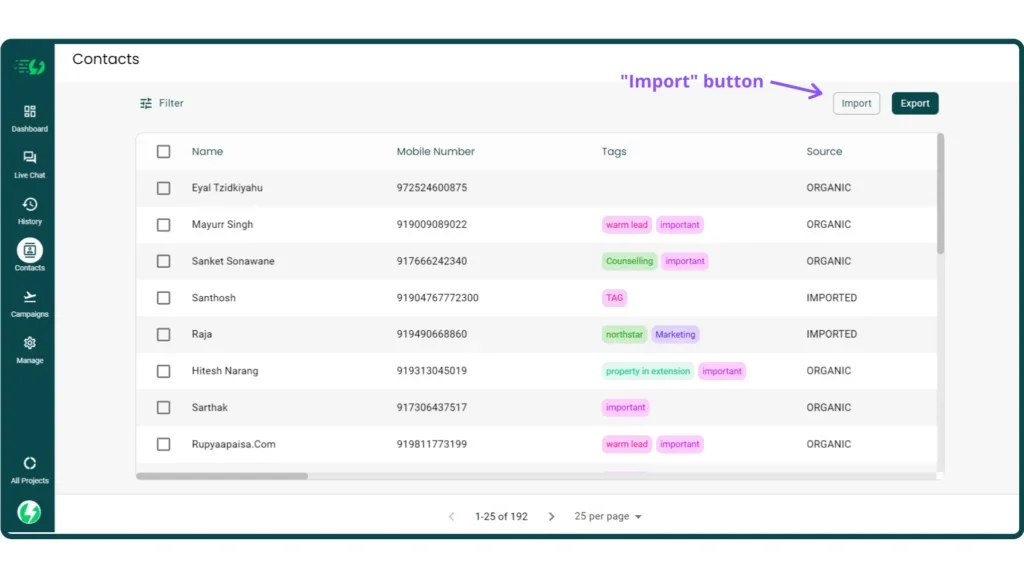
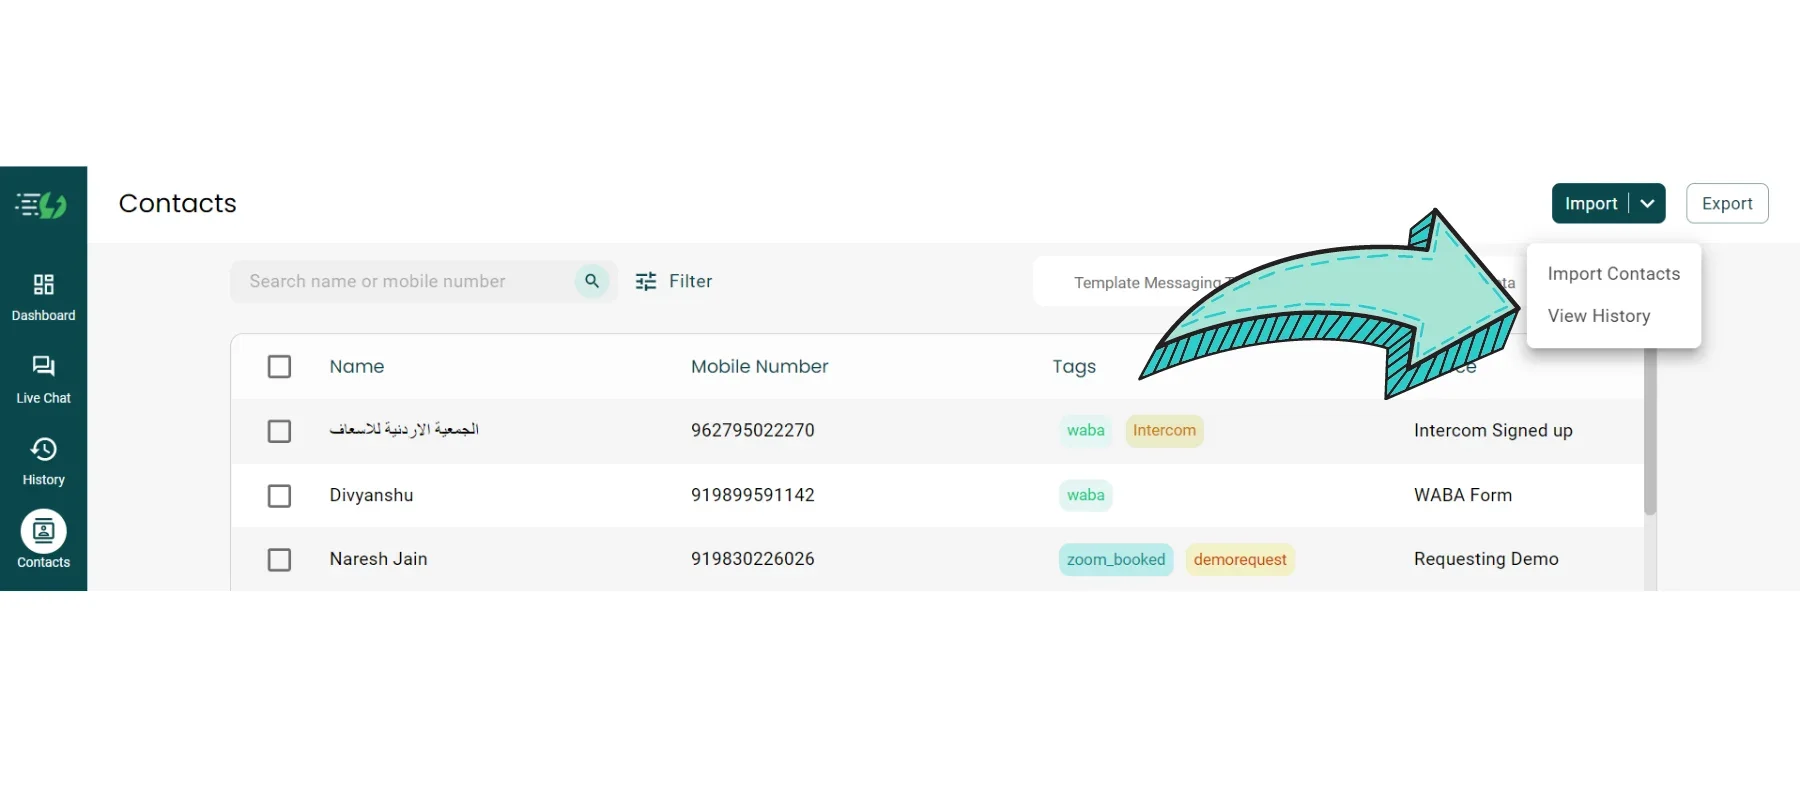
1. Source: This field shows the source of contact creation. For example, “IMPORT” for imported contacts, “ORGANIC” for contacts created when the user-initiated its first conversation with WhatsApp Business API number, “API” for the contacts created through API campaigns and so on and so forth.
2. Status: This field simply shows whether the user is ACTIVE (in 24 hours window) or INACTIVE.
3. State: This filed shows the current state of the user. For example, “Intervened” if the chat is intervened, “Requesting” in case the user is waiting to get intervened, “Closed” if the query is resolved by the Agent and ticket is closed and “Handled by Assistant” if the WhatsApp Chatbot is handling the chat completely.
4. Last Active: This filed shows the Date and Time of the last message sent by the user.
5. Created At: This field shows the Date and Time when the user contact was first created in the AiSensy Dashboard.
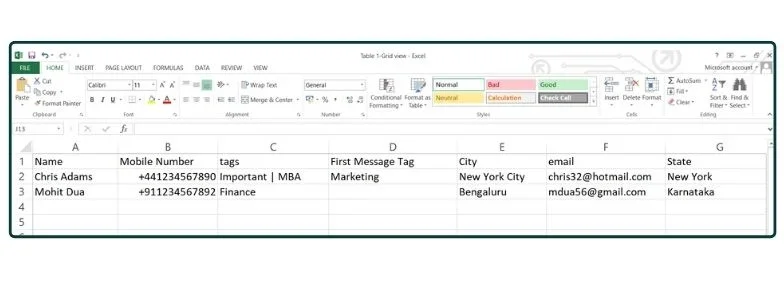
Fields that need to be entered manually in the CSV file and their format-
1. Name: This field is simply the user name of the user. It has the standard Name format. The Name Attribute in the dynamic broadcast messages is fetched from this field such as $FirstName, $Name or $LastName.
Example-
Name: Mohit Dua
$Name: Mohit Dua
$FirstName: Mohit
$LastName: Dua
*The Name field is mandatory to upload a CSV file.
2. Mobile Number: The field contains the WhatsApp Mobile Number of the user. The format of the Phone Number is-
For INDIAN Phone Numbers: It’s just the 10 digits mobile number or with 91 (the country code) or +91. All of them are valid.
Example- 9876543452 or 919876543452 or +919876543452
For NON-INDIAN Phone Numbers: The Phone number should have the country code with the + sign as the prefix.
Example- +15417543010 (For USA) or +61412345678 (For Australia) and so on and so forth for other countries.
Note: If a phone number is entered without a country code and + sign, the AiSensy Platform considers it as an India Phone Number and automatically adds 91 as the prefix.
*The Phone Number field is mandatory to upload a CSV file.
3. Tags: Various tags can be assigned to the users based on lead qualification, current state, specific stages and many other parameters. If a single needs to be assigned to a contact, just write the tag name exactly as mentioned in the AiSensy Platform. In case multiple tags are assigned to a contact, then the tags should be separated by a “|”.
Example- Let’s suppose there are multiple tags in the education sector namely MBA, Marketing and Finance. Now, three different contacts need to be assigned a single, two and three tags. The format of the tags will be
Contact 1: MBA
Contact 2: MBA | Finance
Contact 3: Marketing | Finance | MBA
Note: Make sure the Tags which needs to be uploaded with contacts must be created beforehand in the Tags Section of the AiSensy Platform otherwise the Tags won’t be assigned to the users. Also, the Tags field will remain empty in case you don’t put any value or even don’t have the Tags header in the CSV file.
4. Source: The Source field is the Source Name of the Lead generated. But since it is customisable and can be changed as per the will of the business while uploading, it can be used for specific intents of action planned through AiSensy Platform. The format is quite simple, just write the Source Name in the CSV file and it will be replicated in the Contacts Page.
The Souce Field in the Contacts Page also gets mapped automatically such as “API” if the contact is created through the API campaign, “Organic” in case the user creation is done organically when a new user sends an incoming message and “Imported” if the CSV file is being imported without the Souce Field.
Note: The Source field will remain empty in case you don’t put any value or even don’t have the Source header in the CSV file.
5. First Message: This is a Tag automatically assigned to the users on the basis of their first message. The format of this field is exactly the same as that of the Tags field. The only difference is that it can’t have multiple values, it is singular.
Now you must be wondering about how to configure the First Message Tag? This is covered in the Tags Page of the AiSensy Varsity.
Note: The First Message field will remain empty in case you don’t put any value or even don’t have the First Message header in the CSV file.
6. $Custom_Attribute: This field contains some data points or qualification parameters or attributes of each user. These attributes are used to filter down the contacts on certain interest points in order to send them targeted WhatsApp Broadcast campaigns. These can be automatically collected in the form of questions from the users using a chatbot or can be manually uploaded while importing the contacts.
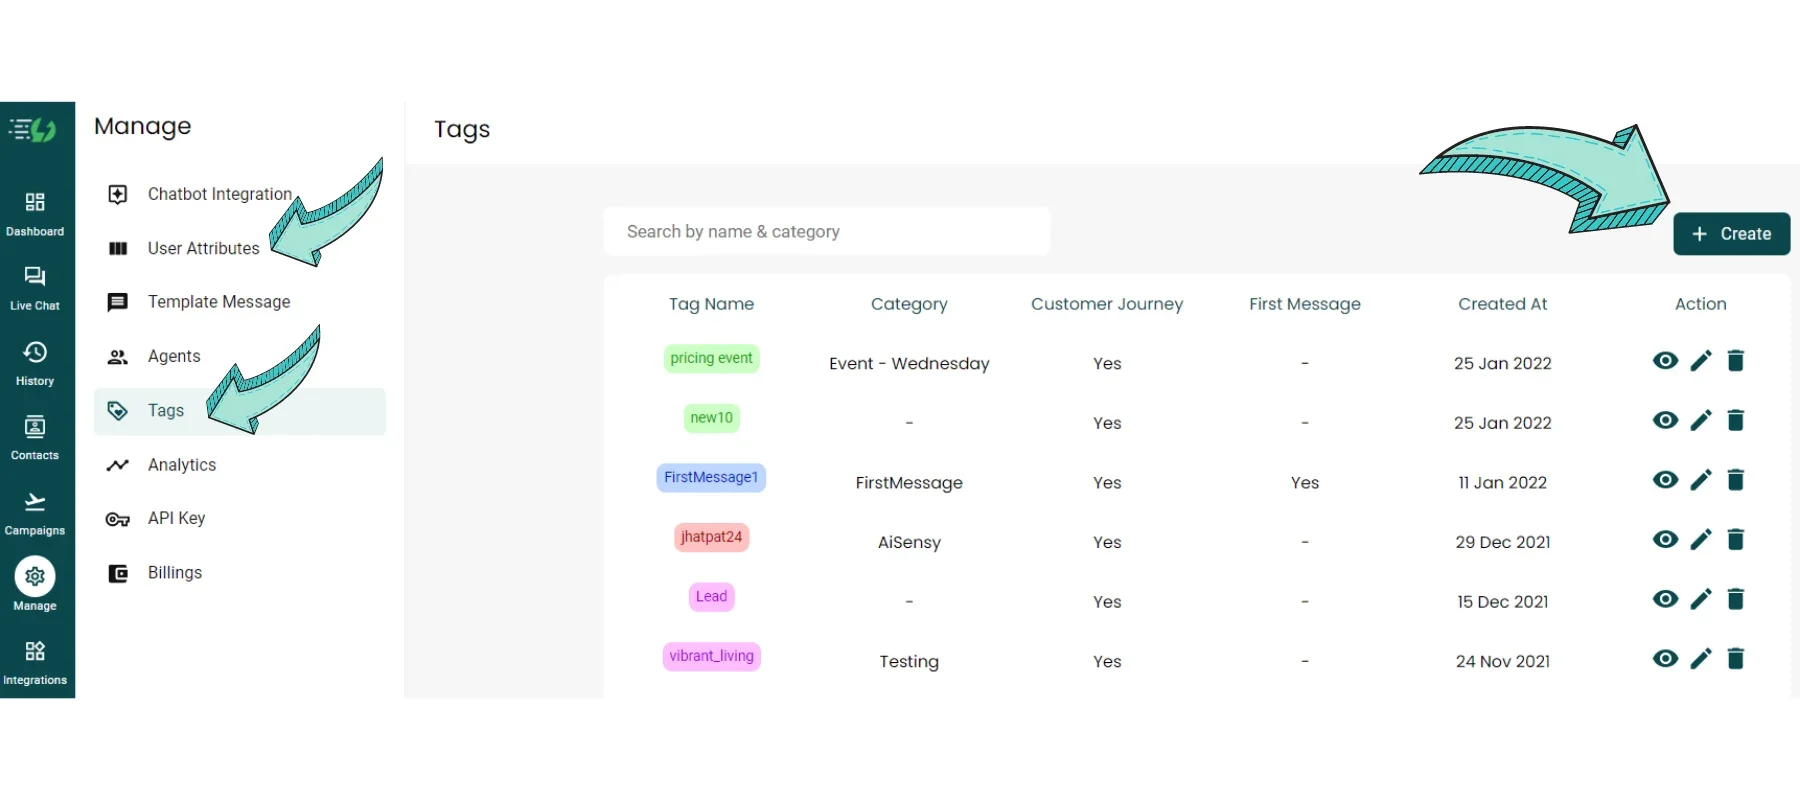
To create these Attributes fields in the Contacts Page, go to “User Attributes” in the “Manager” section of the AiSensy Platform.
Now, you must be wondering how to collect the Attributes from users automatically using a chatbot? This is covered in the User Attributes Page of the AiSensy Varsity.
Note: The $Custom_Attribute field will remain empty in case you don’t put any value or even don’t have the $Custom_Attribute header in the CSV file.


 Your payment was processed successfully. Congratulations!
 You have cancelled the payment process.
 This popup does not exist. I'm sorry.