After Creating the Project, Enter the Project and Click on the Integrations tab in the Left Menu bar.
Once on Integrations, In the Discover tab, you'll find Razorpay App. Please Click on the Razorpay App.
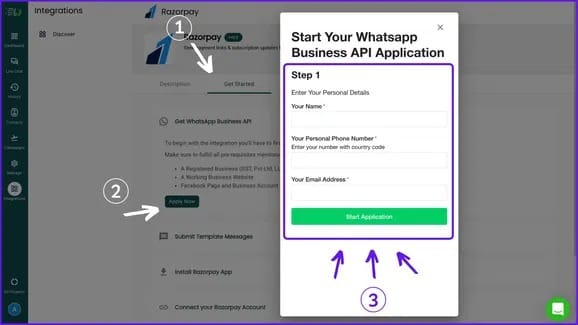
Apply for the WhatsApp Business API
You now need to Apply for the Whatsapp Business API to get your Official Whatsapp Profile through which you will be automating all the notifications.
• Go to the Get Started tab on the Razorpay • Click on the First Menu -> Get WhatsApp Business API • Click on "Apply Now" • Fill the 4 Step form. • WhatsApp API might take 1-3 Days to get Approval
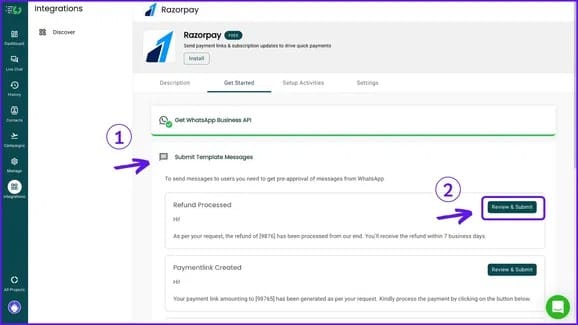
Once your Whatsapp Business API is approved, you'll need to get the Template Messages approved that you wish to trigger on various Razorpay Events.
• In the Get Started Tab, Click on Submit Template Messages • You'll see Sample Template messages, Review and Submit. • Template Messages take 1 minute for Approval.
Note: In certain cases, the approval process can extend to up to 24 hours.
Install Razorpay App
• You can also go to the Settings tab for this Step or do it from the third step on Get Started tab. • Click on "Install App" and your App will go Live
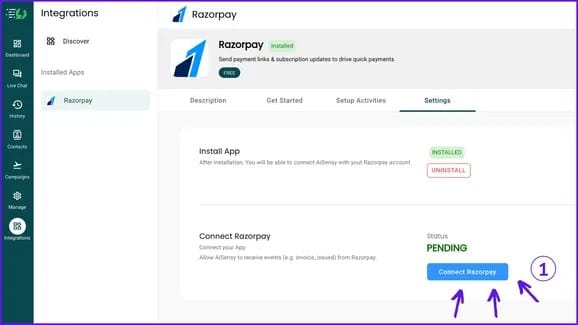
Connect Your Razorpay Account
• In the Settings section, Click on Connect Razorpay • It'll take you to a new tab, Authorize the permission • Now your Razorpay account is Connected to AiSensy
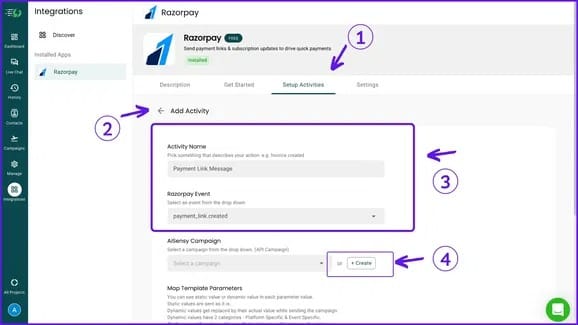
Setup Activity - I
An Activity simply means a connection between any Razorpay Event and AiSensy's WhatsApp Campaign.
• Go to Setup Activities Tab,Click on "+ Activity" within this tab • Give the Activity any name for reference For Eg. Payment Link • Choose the Razorpay Event for which you wish to trigger the campaign • Choose the API Campaign you wish to connect above Razorpay event
(You can also create an API campaign by Clicking on Create)
Setup Activity - II
Map the Parameters for the Campaign you've Chosen
• You can use Razorpay Parameters by typing $RPAY_Email, $RPAY_Amount, $RPAY_PaymentLinkId, $RPAY_Description, $RPAY_GrossAmount
• Also You can use AiSensy Parameters by typing $Name, $MobileNumber, $FirstName, $LastName
Note: AiSensy Parameters $Name and $RPAY_Name are the same when you send a user campaign for the First time. If the user already exists $Name is updated to the name user has setup on their WhatsApp.
• Hence, it is suggested to use RPAY_NAME for personalisation.
• Also, It is suggestable to only use RPAY_NAME if all your Invoices, Payment Links etc on Razorpay are given a name.
You're Good to go! 🎉
In the same manner, you can set up multiple Activities and Automate Campaigns for your Razorpay Events.
For Now, there are four Active Events in the Integration: Payment Link Created, Invoice Issued, Subscription Halted & Refund Processed.
Drive 3x Revenue with AiSensy
Get Started for FREE. No Credit Card needed. ⚡️Powered by Official WhatsApp Business API